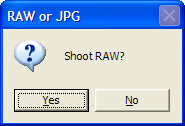
Line: 157; char: 2; Error: Index out of range

Update: Sadly this doesn’t work. Ok I really need to fix this bug soon.

Getting this message from DIYPhotobits.com Camera Control when you click the “Shutter Release” button?

It’s a bug, the script is failing to handle the fact that the camera is very slightly slow in delivering the image after taking it.

To avoid this:

Stop using the “Download Immediately” checkbox

Instead, press the “Start Tether” button.

The result is (almost) the same; when you click Shutter Release the images ARE immediately downloaded (because the tether is running), but it’s by a different piece of code that patiently waits for the image to become available rather than demanding it immediately.

Side-effect; this means if you press the shutter release button on the camera then that image also is downloaded.

Sorry I haven’t posted a proper fix for this. What with a new baby in the house (3 months next week and doing fine) we hardly have time to get our jobs done, let alone our hobbies.

Want Voice Activated Shutter Release for a Nikon?

The software you need is:

  1. Microsoft Speech SDK 5.1
  2. DIYPhotobits.com Camera Control 2.1

Then to get voice activated shutter release:

  1. Install both.
  2. Turn on the Language Bar (in control panel, regional and language, languages, details, language bar)
  3. (Optional) Train Microsoft Voice recognition (in control panel, speech)
  4. Turn on the microphone (click the mic icon in the language bar)
  5. Run DIYPhotobits.com Camera Control 2.1
  6. Say “Voice command”
  7. (optional) Say “What can I say” then scroll down to the bottom of the list where it says “Menus and Buttons” and expand that list, ensure that “Shutter release” is one of the listed commands
  8. Say “Shutter Release”

And yes, of course this thought is inspired by ShutterVoice,  the Canon EOS front end that provides much better control via voice — with voice feedback even!

I wondered if I could do something like that myself — but when I checked I realized that basically everything I wanted was already either built in or a free microsoft download.  I’ll have a think about if I can adjust the UI of my script so more features can be voice controlled, but for now shutter release is fun.

All together now, say “Shutter release”.

DIYPhotobits.com Camera Control 1.0

Update; Now try version 2.

Ok here’s something new — I’ve taken the various little scripts for tethered shooting and remote control and wrapped them up in a nicer interface.  This is the first time I’ve tried writing a “hypertext application” or .HTA file and it’s quite an interesting mix of HTML and scripting.  I think I can do quite a few interesting things with this.  But for now here I have produced:

DIYPhotobits.com Camera Control 1.0

DOWNLOAD (200K installer)

 Use version 2 instead

As I have wrapped up the script in a nice interface I thought I should fix up the download and install process as well.  So it now has a real installer which makes a Start menu icon, installs and registered the Microsoft DLL, and it can be uninstalled via the Control Panel Add/Remove Program icon.

So if you are not happy about download and running text file scripts or installing DLLs yourself then this is the version for you.  I’ve tried to “degeek” it as much as I can!


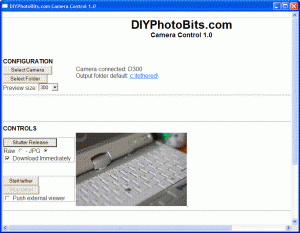
Screen shot of Camera Control 1.0

I haven’t added a lot of new features, this is more of a combination of existing stuff but you will notice:

  • It automatically detects your camera if you have only one installed, it only asks you to select if you have more than one.  And it isn’t confused by scanners any more, it knows those are not cameras.
  • You can choose the output folder to save the files with a click of a button.
  • There is a preview window that shows the image you just shot.  Size is adjustable.  JPG only for now, but if you shoot RAW + JPG then both download and the JPG is displayed.

Existing features maintained include:

  • Choose Raw or JPG when triggering remote shutter
  • Download (optionally) when remotely releasing shutter – if you do then it becomes the “Self Portrait Script”
  • Tethered mode where all images shot using either the PC button or the camera shutter release button are immediately downloaded.  Takes about 7 seconds from pressing shutter release to viewing it full size in Bridge.
  • Pushes external veiwers, including Adobe Bridge CS3 and Windows Explorer, to the next image.
As always comments and suggestions are welcome!   Now that I have a nice solid foundation for this I can go and add some new features that might be fun, so get your suggestions in now.

RAW : in remote shutter release script

Two of my scripts let you press a key on the keyboard, or click with the mouse, and remotely release the shutter.  But just like the built in Windows Explorer technique for doing these they both only are able to trigger JPG, even if the camera is set to RAW.

Until today.  It turns out this is not that hard to fix.  But the programatic technique is a bit of a laugh; because Windows Image Automation does not officially support RAW the NEF files on my Nikon D300 are typed as being of “undefined” type.  Unlike JPG files which WIA does know are JPG files and are typed appropriately.

So to get the WIA Take Picture command to get me a NEF I actually have to ask for a picture of type “undefined”!  It’s amazing it works, I guess somewhere an engineer (I’m not sure Microsoft or Nikon) decided that undefined=NEF.  I have no idea of this will also work with Canon, it might or it might not.  

Anyway it works, and it opens up a whole range of possibilities I’ll be exploring soon with the scripting.  But until then head over to the posts for those remote scripts and you can download the latest versions which support RAW.

PS.  Please please no religious RAW vs JPG comments.   It’s a free world, people are entitled to the file format of their choice.

Windows Remote Shutter Release HOWTO

I explained before how my remote shutter release script was actually redundant, because Windows has a built in feature that does this. Of course I did then go forward and make the self-portrait script which does do something more useful, remote shutter release combined with immediate download and viewing, but the original idea of a simple remote shutter is still useful.

So I thought a better explanation of how that Windows feature works might help, and it’s good practice for me making videos as well:

Via YouTube:

Via Vimeo:

Having found the RAW/JPG limitation though I’ll be taking a look to see if I can script my way around that.  Stay tuned!

D300 Remote Control Script

Update: This is now obsolete for two reasons, firstly remote is built into windows, and secondly for advance use you have the DIYPhotobits.com Camera Control 1.0 application.

I wrote yesterday about why I need this script to be a remote shutter release for my Nikon D300 so today here are the details of what you need, and how to use it.  Oh, and why not use one of the cheap 3rd party remotes

 (e.g. Phottix N1

or Cleon N8), a real remote like a ML-3 or a MC-DC1 Remote cord?  Well if I can DIY I’d always like to try that first!

Hardware (this is what I used, you can substitute some pieces of course):

  • Long USB cable — doesn’t have to be that long but longer is more convenient
  • One Thinkpad X31 — or any laptop with a USB port and a Wifi connection
  • One Fujitsu Lifebook — or any other laptop with a Wifi connection
  • Wireless access point — so you can connect from one PC to another
  • Windows XP SP2 on both PCs
  • Microsoft Windows WIA Automation
  • The software Linked below
DOWNLOAD (2.0)remote2

– RAW or JPG, you choose

– JPG only
Installation:

Copy the files into any folder on your PC, I suggest c:program filesremote but it’s up to you.

Usage: 

  • Make sure your camera is in USB PTP mode
  • Plug the USB cable into the first laptop and into the camera, turn the camera on and cancel any pop-ups that occur for downloading etc
  • Install the Windows WIA Automation DLL by running install.cmd (you only need to do this once)
  • Run the script c:program filesremoteremote.wsf by double clicking it.

… and here’s the key thing that makes it wireless

  • Now use your second laptop and use the built in Windows Remote Desktop function to connect to the first laptop over your wireless connection.
  • To release the shutter on your D300 just click or use the enter key to press the “OK” button

Works with:

  • Nikon D300
  • Nikon D40
  • … and I presume would on any Nikon dSLR
  • Cost:

    • Long USB cable $2
    • Thankpad X31 $1,099
    • Fujitsu Lifebook $1,507
    • Linksys Wifi Access point $47
    • Windows WIA Automation $0
    • My script $0
    • Total: $2,655

    Or, if you already have all that hardware then :

    • Total: $0

    Variation, remote but not wireless:

    A very long mouse cable or keyboard cable could get you a similar effect with one laptop/computer – but that wouldn’t be so much fun now would it?  Or how about a wireless keyboard or mouse?

    And next:

    And then this could be combined with the tethered shooting script – plus a “advanced to next image” script to get some good results, that’s the next thing to do on the scripting side.

    Please let me know if you try this out and it works for you!  I know this isn’t particularly easy to understand from reading the above, but you’ll find it easy if you try – and I’ll try to do a video some time to show how it works.


    Update: The combined script that has the remote shutter release functionality here plus the tethered downloading I called the “Self Portrait Script” and you can download it

    here .

    Coming soon – the world’s most expensive DSLR remote control

    Yes, to go with my expensive D300 — I now find I have no wireless remote control shutter release.  The handly little not-particularly-cheap ML-L3 remote that worked for my D40 is no good for the D300.

    Instead I’m supposed to buy an ML-3 remote — which costs about ten times the price.  Sure it does a lot more, but I don’t particularly want more, I just want to press a button in my hand while the camera is on a tripod at the other side of the room as I do endless self-portraits while practicing my off-camera lighting.

    So, what is a geek to do?  Well, build something yourself of course — with the techniques in mind that I used for the Tethered Shooting script I realized I could put together a wireless remote with things I had hanging around.

    Now if I add up the cost of all those items it comes to about 25 times the cost of the ML-3, so that would have to count as the most expensive dSLR wireless remote control in the world!   But…  If I already have all the gear then the extra cost to me is zero.

    So once again it’s a bit (ok a lot) of hardware tied together with a few lines of code – Windows only (XP SP2 minimum) in the version I’m doing, but I’m sure Macs can do something very similar.

    Details tomorrow when I get it all packaged up.