And it has… “Native tethered shooting support for select Nikon and Canon DSLR cameras”… So that may make my script obsolete, at least for those with Lightroom.
Do you Backup as you shoot?
I do, at least I am able to do when I’m shooting tethered with my CameraControl 4.1 script. Every image goes onto the flash memory card in the camera *and* onto the hard disk of the attached PC.
That matters to me when I’m doing a critical shoot. To me a critical shoot means one of my wife or my kids, capturing moments near to my heart which may never be exactly replicated. Particularly true with a 4 month old baby! It’s amazing how every week he is do different – so no going back and saying “I’ll take that picture again next week”, coz it won’t be the same will it?
Not that I have ever had a memory card fail in any of my DSLRs (D40 or D300), but I have had them fail either technically or due to operator error and lost shots I’m sad about. There is only one chance at a “first time” for something particularly with kids.
So if I shoot tethered, with a tiny Fujitsu Lifebook perhaps in a backpack if I’m moving about and a cable into the camera then I’m sure I have two copies of everything.
Of course I could get a D3 instead with two card slots which I believe allows shots to be written to both, but wouldn’t that be overkill?
DIY Wireless tethering USB solution
DIYPhotobits.Com Camera Control 4.0 – Basic Bracketing
It is here, it is basic, but it works (somewhat) — Bracketing. Once again I find myself either spending an hour I have available to work on the code, or publishing what I already have working, limited though it may be.
So here we have 4.0 – the Basic Bracketing version.
Expect bugs — that’s why the version is a .0 one! However it should do you for some basic HDR or timelapse uses.
Update:
- Only works in P, A or S modes as the bracketing is controlled by adjusting the exposure compensation. I’ll do M mode support later.
- The package has the wrong version number (3.1) on the Start menu icon,but once you open the script itis the correct 4.0
- Tested on D300 and D40 ok
DIYPhotobits.com Camera Control 2.0 : Embarrassment
Update, try the
Camera Control 2.1 instead which fixes some bugs.
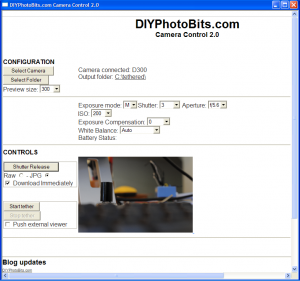
Ok so here is DIYPhotobits.com Camera Control 2.0 — the Embarrassment release. I’ve named it that because I’ve had no time to work on it recently and so it still is a) very rough with major holes and b) fails to have all the obvious fixes and enhancements that I have discussed with people.
– Try instead 2.1 which fixes some bugs
So why release it at all? Well because having control of the camera exposure from the computer is cool — and at the moment I have it sitting here on my PC working and maybe you’d like to have it on your PC working as well.
New features:
- Control exposure mode (M/S/A/P) – Tested D300 works, D40 does not (because that setting is a physical dial on the D40 and software can’t override it)
- Control Shutter speed, Aperture, ISO, WB and Exposure Compensation from the PC – Tested D300 and D40 work
- Shows battery status while in tethered mode – Tested D300 works
New known bugs, issues and uglinesses
- Exposure Compensation drop down makes no sense — 0 means 0 but the others are internal codes, you’ll see what they mean after a few moments though, each one is a third stop plus or minus.
- Not all the exposure setting drop downs default to sensible values, e.g. the current camera settings.
- Also read this bug list
- doesn’t save the download target folder name between sessions — should be an easy fix
- doesn’t download RAW on *some* Vista machines — a mystery
- finds files exist and complains on each tethered download for some machines — another mystery
- refuses to believe some cameras can take pictures — needs investigation, but perhaps I can just have it ignore this or make it a warning instead of fatal
- crashes if the camera can’t focus — I know how to fix this
- looses camera if cable is unplugged, even if it is plugged in again — I think I have a solution to that but it is clumsy, not sure if it will really work
- Time lapse / intervalometer
A peek at where I’m up to with Camera Control
This still isn’t finished but I’m quite happy that I’ve got so far all ready…

Now I can control from the PC which exposure mode the camera is in (M, P, A, S) — but only on the D300, I suppose sensibly it is impossible to control that on the D40 where it is set by a physical dial.
But presuming the mode allows it I can then control aperture and shutter speed easily. ISO, and WB are easy to set — but I can’t tell what the initial settings of the camera are when it is plugged in which is a bit annoying.
Still have some work to do on the Exposure Compensation control as well. And generally on the layout of the controls to make them fit together in some sort of sensible way.
But look out soon for this new version — and let me know what other controls or info you’d like to see in here.
DIYPhotobits.com Camera Control 1.0
Update; Now try version 2.
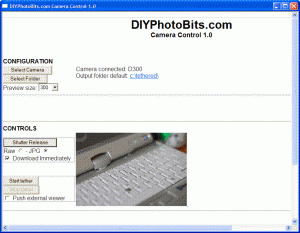
Ok here’s something new — I’ve taken the various little scripts for tethered shooting and remote control and wrapped them up in a nicer interface. This is the first time I’ve tried writing a “hypertext application” or .HTA file and it’s quite an interesting mix of HTML and scripting. I think I can do quite a few interesting things with this. But for now here I have produced:
DIYPhotobits.com Camera Control 1.0
DOWNLOAD (200K installer)
As I have wrapped up the script in a nice interface I thought I should fix up the download and install process as well. So it now has a real installer which makes a Start menu icon, installs and registered the Microsoft DLL, and it can be uninstalled via the Control Panel Add/Remove Program icon.
So if you are not happy about download and running text file scripts or installing DLLs yourself then this is the version for you. I’ve tried to “degeek” it as much as I can!

I haven’t added a lot of new features, this is more of a combination of existing stuff but you will notice:
- It automatically detects your camera if you have only one installed, it only asks you to select if you have more than one. And it isn’t confused by scanners any more, it knows those are not cameras.
- You can choose the output folder to save the files with a click of a button.
- There is a preview window that shows the image you just shot. Size is adjustable. JPG only for now, but if you shoot RAW + JPG then both download and the JPG is displayed.
Existing features maintained include:
- Choose Raw or JPG when triggering remote shutter
- Download (optionally) when remotely releasing shutter – if you do then it becomes the “Self Portrait Script”
- Tethered mode where all images shot using either the PC button or the camera shutter release button are immediately downloaded. Takes about 7 seconds from pressing shutter release to viewing it full size in Bridge.
- Pushes external veiwers, including Adobe Bridge CS3 and Windows Explorer, to the next image.
Tethered Shooting Script — a HOWTO Video
Since I first posted my free script that allows Nikon DSLRs to be shot tethered I’ve been very pleased with the response, it seems to have been helpful to many people. However I’ve hardly been very good at documenting how to use it. So in an attempt to fix that I’ve made this little video which shows how to use it.
Or view high quality YouTube version
This is my first video attempt so it is pretty basic — but it took me all afternoon to put together, so please excuse the rough edges. Hopefully I’ll work out how to do this better and perhaps make some videos explaining my hardware DIY projects which would also benefit from this type of explanation.
If you’re not sure about tethered shooting then ProPhotoLife has just released a great video
, as usual, explaining all about it – using Canon as an example. I particularly like his safety tips regarding long USB cables.
Tethered shooting with Bridge viewing
Update: This is now obsolete, use instead the DIYPhotobits.com Camera Control 2.1 – Greens
application.
Here’s an update to the Tethered shooting script
— this one customized to work with Bridge for viewing.
Instructions and usage are the same as the original except that if you have Bridge open on the tethered shooting folder — “c:\tethered” by default — then after each new image is added Bridge will advance to that image by pressing [END] to go to the last image in the folder. You need to have sorting set appropriately so the most recent image is the last in the folder.
It doesn’t work with Slideshow unfortunately but you can collapse the side panels (use the tab key) and maximize the size of the thumbnails to get an almost-full-screen view of the images as you shoot them.
